I've been baking for a while now and quite happy with the way my bakes come out of the oven.For a long time I believed (or made myself believe!)that taste is what matters,not the looks.As long as the cake/cupcake or any other bake tasted amazing,it didn't matter one bit if it was decorated or left plain.After all,frosting simply meant extra sugar and we could do very well without that right?
All this changed for me when I got a few birthday cake orders from my friends for their kids.They didn't want a fancy cake alright but when I was asked to bake for someone else,I wasn't too happy with the product I was giving them.That too for their birthdays!I decided that I have to learn cake decorating,at least for times when I was baking for others.
I've always felt I was not someone who'd you call 'artistic'.I can follow directions but cannot do something creative on my own.Cake decorating gave me a good start,I realized I loved making patterns(even if imperfect!)and soon got addicted to it.I was content when my cakes started looking good as well.A big thanks to Subhashini who gave me a good start and keeps giving me directions when I'm stuck :)
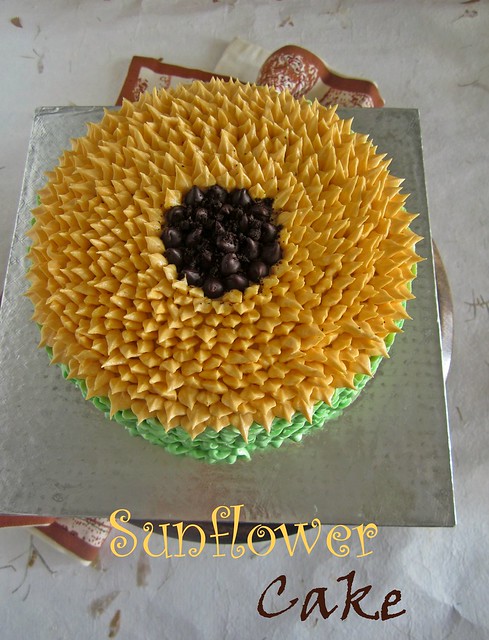
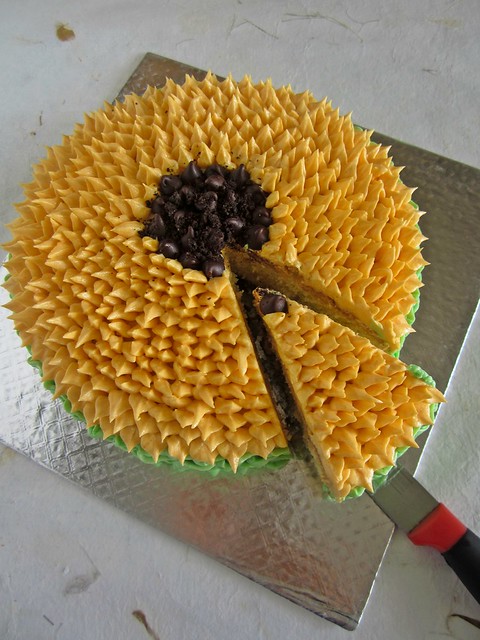
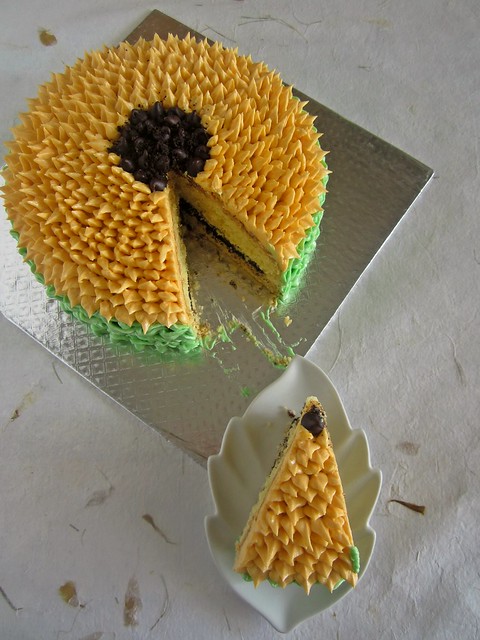
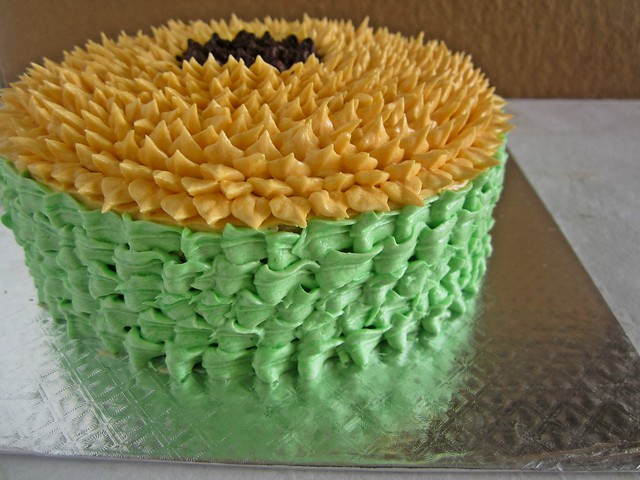 Here I present you a super simple cake decorating technique.Using a good vanilla cake(or any flavour of your choice)as the base,some buttercream and 2 leaf tips you can create a stunning Sunflower Cake for your loved ones.Don't tell them it is so easy to make ;)
Sunflower Cake Tutorial
Things you need
One 8' round cake - I used my favorite cake recipe(without Nutella)
One batch Whipped Buttercream
1/3 cup Dark chocolate ganache OR any filling of your choice
Leaf tip - 68 (Ateco)for the sides
Leaf tip - 352(Ateco)for the top
Edible gel colour - Lemon Yellow,Golden Yellow,Leaf Green(Wilton)
Disposable icing bags - 2
How to proceed
Bake and cool your cake completely.If possible cover in cling wrap and refrigerate overnight.Chilled cakes are easier to torte and crumb coat.
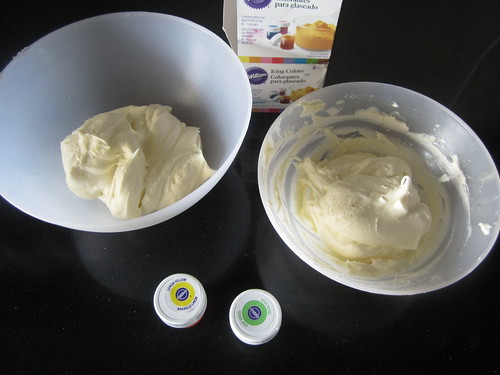
Divide the buttercream into two parts(I always keep about 1/3 cup icing aside before coloring just to be safe).Colour one part yellow and one part green.
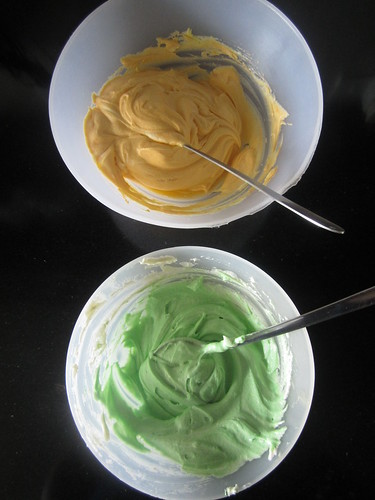
To colour the icing-dip a toothpick into your desired colour and swirl into the icing.Use a new toothpick for colouring it second time-do not use the same toothpick-blend well using a spatula and keep adding colour till you get the desired shade.
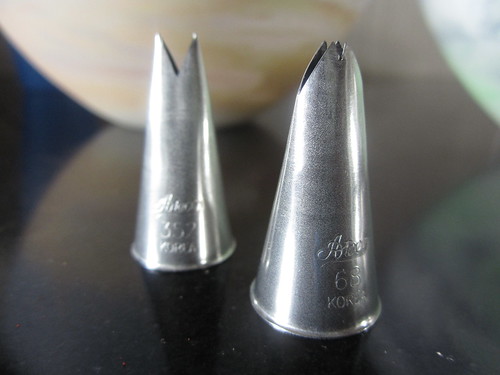
Place the two leaf nozzles in two disposable icing bags by snipping the end of the bag and placing the nozzle in it.I use the glass method to fill my icing bag.
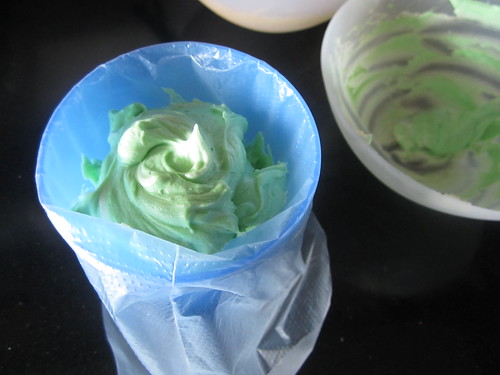
Use a big plastic glass and place your icing bag in it.Fill about little more than half of the bag with buttercream.Twist the bag closed and remove air bubbles if any by squeezing some of the icing by the tip into the bowl.
You can leave the cake plain(without filling)or torte the cake into two even pieces horizontally.Sandwich the cake with ganache and do a simple crumb coat.
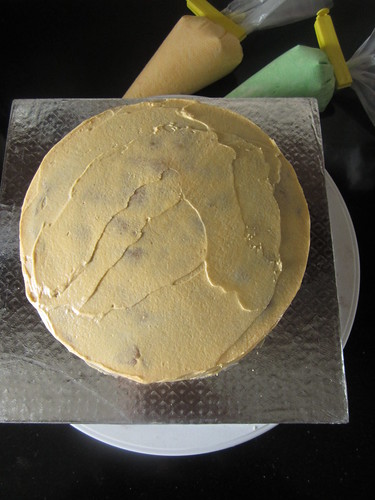
Crumb coating is done by using a very thin layer of icing on the cake and is done to seal in any crumbs.Apply about 1/4 cup of icing on the cake and smooth the icing as best as you can.I didn't do a very good job as I thought anyway the cake is going to be covered,don't be like me :)
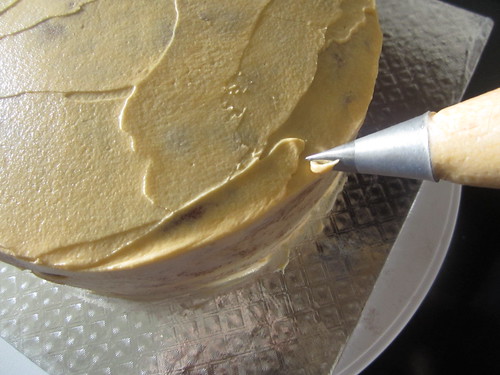
Start from the outside of the cake-Hold the bag at a 45D angle with the point of the triangle of the tip facing upwards and squeeze out one petal.Make sure the tip of the petal stands upright.
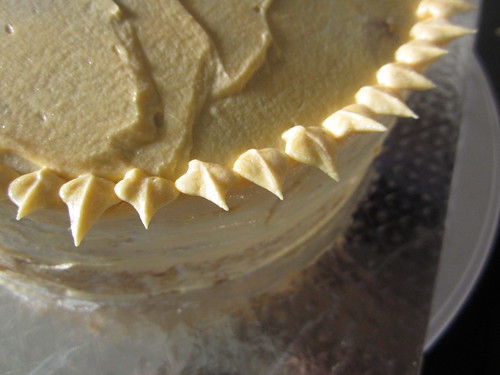
Pipe another one close to it and follow this method till you finish one full round.
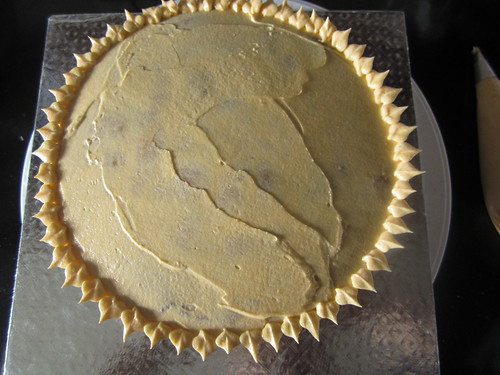
Start piping petals inside and keep filling the whole cake with this method.
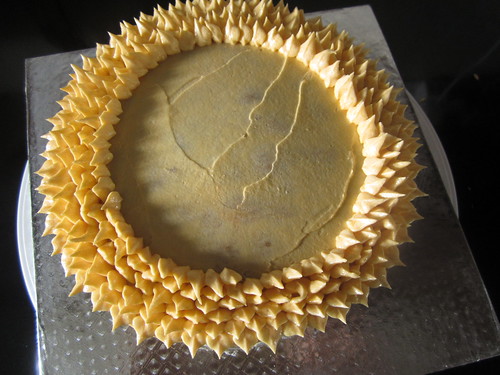
When you are about 3/4 done,mark a small round in the middle of the cake,using a bottle cap or a cookie cutter.Fill the round with chocolate chips and some Oreo crumbs.
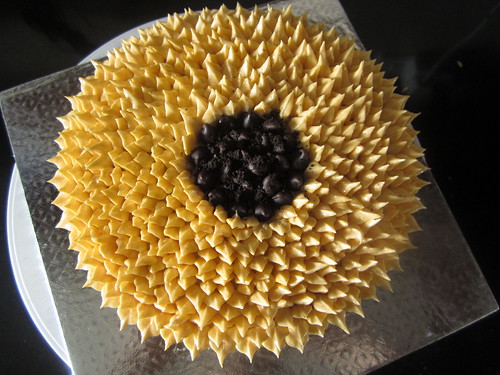
Continue piping round the center till you are done.
Now the sides
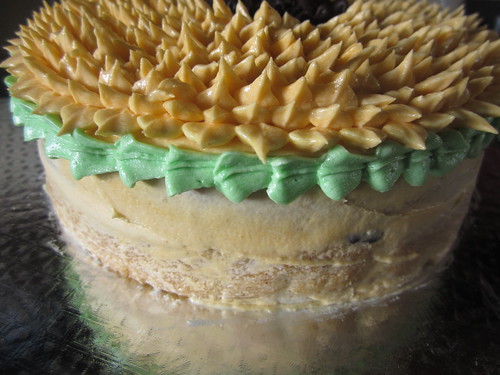
Hold the green coloured piping bag and do a shell-motion by piping one leaf and starting the next one at the tip of the first leaf.
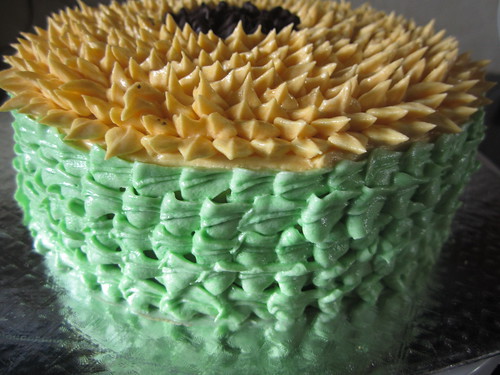
Finish the sides of the cake by piping this way.
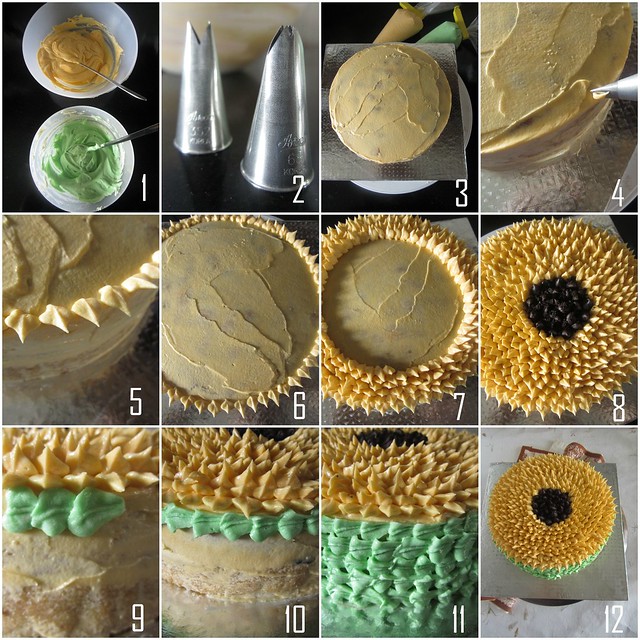 I have tried my level best to explain it in a simple manner.Still if you have any doubts,please let me know in the comments section.Also let me know if you'd like more tutorials like these.All ideas are welcome :)
All this changed for me when I got a few birthday cake orders from my friends for their kids.They didn't want a fancy cake alright but when I was asked to bake for someone else,I wasn't too happy with the product I was giving them.That too for their birthdays!I decided that I have to learn cake decorating,at least for times when I was baking for others.
I've always felt I was not someone who'd you call 'artistic'.I can follow directions but cannot do something creative on my own.Cake decorating gave me a good start,I realized I loved making patterns(even if imperfect!)and soon got addicted to it.I was content when my cakes started looking good as well.A big thanks to Subhashini who gave me a good start and keeps giving me directions when I'm stuck :)
 Here I present you a super simple cake decorating technique.Using a good vanilla cake(or any flavour of your choice)as the base,some buttercream and 2 leaf tips you can create a stunning Sunflower Cake for your loved ones.Don't tell them it is so easy to make ;)
Sunflower Cake Tutorial
Things you need
One 8' round cake - I used my favorite cake recipe(without Nutella)
One batch Whipped Buttercream
1/3 cup Dark chocolate ganache OR any filling of your choice
Leaf tip - 68 (Ateco)for the sides
Leaf tip - 352(Ateco)for the top
Edible gel colour - Lemon Yellow,Golden Yellow,Leaf Green(Wilton)
Disposable icing bags - 2
How to proceed
Bake and cool your cake completely.If possible cover in cling wrap and refrigerate overnight.Chilled cakes are easier to torte and crumb coat.

Divide the buttercream into two parts(I always keep about 1/3 cup icing aside before coloring just to be safe).Colour one part yellow and one part green.

To colour the icing-dip a toothpick into your desired colour and swirl into the icing.Use a new toothpick for colouring it second time-do not use the same toothpick-blend well using a spatula and keep adding colour till you get the desired shade.

Place the two leaf nozzles in two disposable icing bags by snipping the end of the bag and placing the nozzle in it.I use the glass method to fill my icing bag.

Use a big plastic glass and place your icing bag in it.Fill about little more than half of the bag with buttercream.Twist the bag closed and remove air bubbles if any by squeezing some of the icing by the tip into the bowl.
You can leave the cake plain(without filling)or torte the cake into two even pieces horizontally.Sandwich the cake with ganache and do a simple crumb coat.

Crumb coating is done by using a very thin layer of icing on the cake and is done to seal in any crumbs.Apply about 1/4 cup of icing on the cake and smooth the icing as best as you can.I didn't do a very good job as I thought anyway the cake is going to be covered,don't be like me :)

Start from the outside of the cake-Hold the bag at a 45D angle with the point of the triangle of the tip facing upwards and squeeze out one petal.Make sure the tip of the petal stands upright.

Pipe another one close to it and follow this method till you finish one full round.

Start piping petals inside and keep filling the whole cake with this method.

When you are about 3/4 done,mark a small round in the middle of the cake,using a bottle cap or a cookie cutter.Fill the round with chocolate chips and some Oreo crumbs.

Continue piping round the center till you are done.
Now the sides

Hold the green coloured piping bag and do a shell-motion by piping one leaf and starting the next one at the tip of the first leaf.

Finish the sides of the cake by piping this way.
 I have tried my level best to explain it in a simple manner.Still if you have any doubts,please let me know in the comments section.Also let me know if you'd like more tutorials like these.All ideas are welcome :)





Can so relate to your post when you say, i believed taste was only more important for cakes! Still working my way up decorating.. it's a strong hard climb for me who has never been very artistically inclined. Subhashini is my guru as well!! She's so patient and generous to share information!!
ReplyDeleteWow awesome it is!!! Superbly explained divya!!! Loving it totally!
ReplyDeleteHats off to your patience !! tutorial is too good .... keep up the good work
ReplyDeleteI love the patience with which you decorated the cake AND the painstaking picture tutorial. Such thorough tutorials are very useful for readers. Though I do bake basic cakes and do some modest decorations on them, still I would love to read more tutorials, so bring them on, I say!
ReplyDeleteBeautiful.. great job :)
ReplyDeleteits simply superb ...
ReplyDeletethat a really patient work. beautifully done cake.
ReplyDeleteFabulous... U have lot of patience !
ReplyDeleteWow, very impressive! I'm absolutely useless at piping, I don't think I would ever have the patience to produce something this detailed, it's lovely. :)
ReplyDeleteIam a silent reader but love ur recipes. tried many of them with fantastic results. trusted blog for cake recipes. tutorials is superb. v want more. 1 more request pl. give list of basic tools for cake decoration and their brand name if possible. it will help us. Thank you so much for the help.
ReplyDeleteBeautiful and a well explained useful post.
ReplyDeleteBeautiful cake Divya, that's a lot of patience! Lovely tutorial!
ReplyDeleteappreciate your effort patience and skill . above all your attitude to share it with everyone.
ReplyDeletewell done Divya
Love you for this
Beautiful cake, well explained how to decorate with step by step instructions.
ReplyDeleteI love how sunny and beautiful this cake is!
ReplyDeleteI had seen a similar tutorial on pinterest and of course pinned and now I have another fantastic one here!
I love cake decorating and I have done the Wiltons course.
Have you used Aetco tips?
Cake look splendid.very well explained. Great job
ReplyDeleteIts so true that even when it comes to food, looks matter.....Wonderful job with the frosting.
ReplyDeleteTeena
feedyourtemptations.com
Its so true that even when it comes to food, looks matter.....Wonderful job with the frosting.
ReplyDeletefeedyourtemptations.com
Its so true that even when it comes to food, looks matter.....Wonderful job with the frosting.
ReplyDeleteTeena
feedyourtemptations.com
look absolute stunning deco ...Great job ...First time here .Happy to follow you .
ReplyDeleteBeen sometime since I saw a post from you. Hope all's well. Come back soon :)
ReplyDeletehey why are you not posting any recipes. Hope all is well at your end
ReplyDeleteWow !! Fantastic cake ever I love it very nice superb. :) Thank you :) private chef in austin
ReplyDeleteamazing......happy to follow u....
ReplyDelete